by royalcrownroofing | Nov 16, 2026 | Roof Maintenance
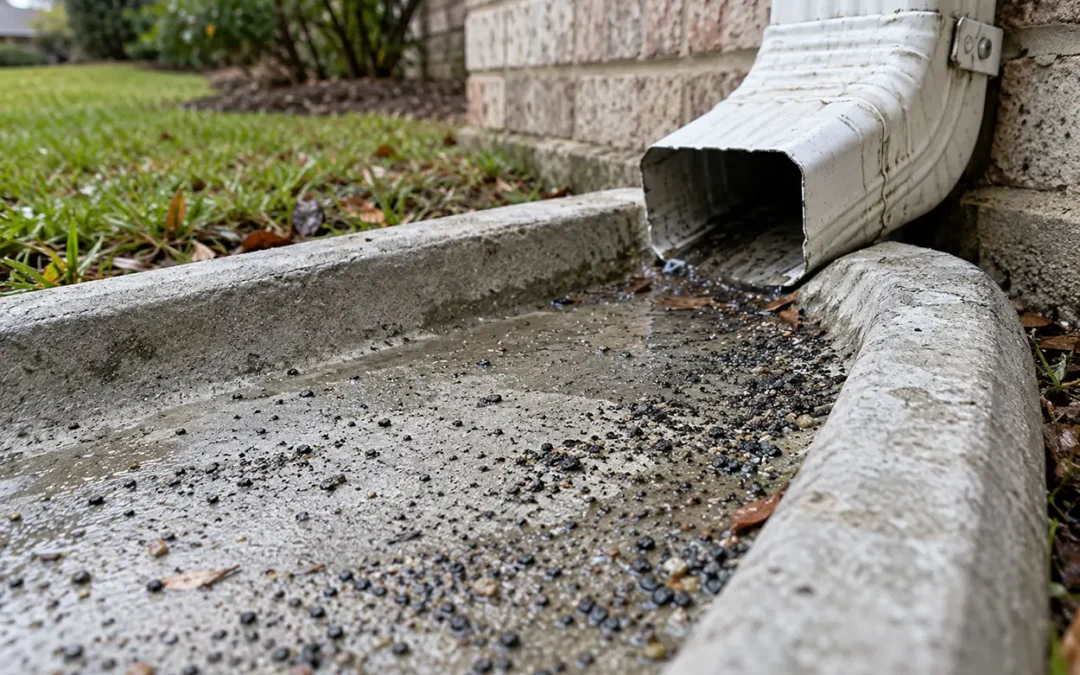
Finding gritty material at a downspout is unsettling when the roof above it is only weeks old. You have just paid for a major project, and you want to know that the shingles are holding up as they should. A new roof losing granules does not automatically mean something has gone wrong, but the explanation should fit what is happening on your roof.
Some loose particles are left over from manufacturing, while missing protective coverage on the shingles is a different concern. The useful question is whether you are seeing harmless excess material working loose or a change that needs a closer professional look.
Why New Shingles Release Loose Granules
The rough mineral surface of an asphalt shingle helps protect the asphalt beneath it from ultraviolet light. Manufacturers apply extra granules to achieve thorough coverage, and some loose particles remain with the packaged shingles. IKO’s roofing FAQ explains that these excess particles, often called “hitchhikers,” can come off after installation and collect in gutters or at downspouts. Their departure is different from losing the embedded granules that cover the asphalt.
GAF’s technical bulletin on new-shingle granule loss describes this early shedding as normal and generally decreasing over time. That means granules in gutters after roof replacement can have an ordinary explanation even when the material looks worrying at first.
Gutter Debris Is Only Part of the Picture
Gutter grit alone does not reveal the condition of the new shingles. Malarkey’s granule-shedding bulletin notes that material left in existing gutters may include granules from the previous roof. Ask whether the gutters were cleared during replacement and when the buildup was first noticed. An assessment should consider the actual shingle coverage, rather than relying on a universal “handful” rule.
Which Changes Deserve a Call to the Installer?
Visible loss of the shingle’s protective surface deserves attention, even on a recently completed roof. TAMKO’s homeowner guidance identifies exposed asphalt caused by excessive granule loss as a reason for prompt attention.
A patch that looks darker from the driveway is a reason to ask a question, not proof of exposed asphalt. IKO explains that lighting, viewing angles, and surface texture can also make shingles appear differently shaded. Ask the installer to distinguish a visual effect from actual missing granules and to show you what supports the finding. The distinction matters when someone is proposing a repair or describing the condition as a product defect.
Keep the installer informed if significant shedding continues, the roof’s appearance changes, or other damage becomes visible. GAF specifically identifies continued significant loss, color changes due to granule loss, and other shingle damage as reasons for follow-up after the initial period. Report a leak or obvious damage promptly rather than waiting to see whether the loose granules settle down.
How to Follow Up Without Guessing
Start the conversation with the installation date, the shingle brand and product name, and where you noticed the material. Include dated photos of an accessible downspout outlet or ground-level buildup, along with any visible change on the roof that you can photograph safely. Mention recent hail, strong winds, or work near the roof without assuming those events caused the condition. If you have photographs from the end of the installation, share those as well.
Manufacturer descriptions of normal shedding do not all use the same timeframe. GAF discusses an observation period of several months, while IKO describes loose excess granules coming off during the first few years of exposure. Ask for guidance tied to your actual shingle product and the condition the installer has observed, rather than treating a calendar date as a diagnosis. A recommendation to monitor should also explain what change would justify an earlier call.
Resist the urge to scrub a patch or brush away loose particles to see what remains. IKO warns that harsh scrubbing can remove granules, which would add a new problem to the one you want assessed. Gather accessible photographs from the ground and leave close examination of the roof surface to the contractor.
After the assessment, ask for a plain explanation of whether the surface remains covered and what, if anything, needs to happen next. If the recommendation is observation, agree on a follow-up point. For a possible product concern, establish who will contact the manufacturer and what documentation is required. Keep that response with your roofing paperwork without assuming that an inquiry establishes a defect or guarantees coverage.
Get an Answer About Your New Roof
If you are concerned about your new shingles, Royal Crown Roofing provides roof inspections for homeowners in Spring, The Woodlands, and North Houston. The company offers residential roof repair and installs GAF roofing systems. Contact the team with your installation details and photos to discuss whether a roof inspection in Spring, TX, is the right next step.
by royalcrownroofing | Nov 9, 2026 | TPO Roofing
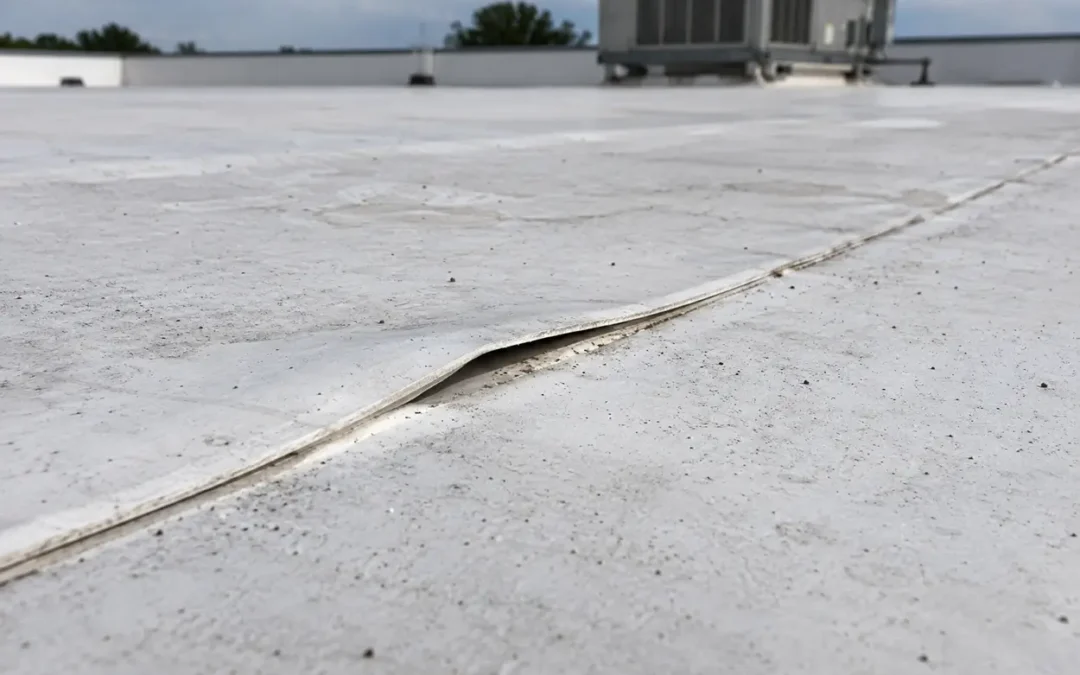
A roofing inspection photo shows a lifted edge where two white membrane sheets meet. The roof may have a leak, or the seam may have been flagged before water appeared inside. Either way, you need to know whether this is one repairable defect or evidence of a problem that extends farther across the building. A useful assessment of TPO roof seam failure should answer that question before you approve the work.
For a commercial property owner in Spring or North Houston, the immediate concern is practical: what needs attention now, and what evidence supports the proposed repair? Start by separating a suspected opening from a confirmed defect, then ask how the contractor will establish its full extent.
What an Open Seam Actually Means
TPO roofing uses overlapping membrane sheets joined with hot-air welding. The weld fuses the overlapping surfaces, creating a continuous connection along the seam. If part of that connection is absent or separates, the opening can provide a route for water beneath the membrane, so the condition deserves prompt professional attention.
Why TPO Roof Seams Can Fail
An inadequate original weld is one possible explanation for TPO roof seam separation. GAF’s installation guidance explains that dirty or damp welding surfaces interfere with fusion, while equipment setup and changing weather conditions affect the welding process. A seam can therefore look joined without having the bond it needs. The roof’s age or the timing of a recent storm does not, by itself, establish why a particular seam opened.
A previous repair also deserves a close look, particularly where new material was joined to an older, weathered surface. Ask the roofer to distinguish a weld defect from damage to the membrane beside it, and to explain which observations support the diagnosis.
A Photograph Cannot Confirm the Weld
Photographs are useful for locating lifted edges, wrinkles, and visible gaps, but seam integrity requires more than a surface view. Carlisle’s seam-checking guidance describes professional probing along cooled weld edges to find areas where the layers have not bonded. This is controlled work with a suitable tool, not an invitation to lift edges with a screwdriver.
The report should identify where the opening starts and stops. If several defects appear along the same seam, ask whether adjacent lengths and comparable details have been checked as well. A close-up of one gap cannot tell you how much of the surrounding seam is sound. Request both a detail photo and a wider view that locates the defect on the roof.
When an interior leak prompted the visit, the inspection should also consider nearby roof details rather than stopping at the first suspicious seam. Carlisle’s inspection guidance includes flashings at penetrations, curbs, and drains, which helps explain why the evaluation needs to consider more than the field membrane alone.
What a TPO Seam Repair Should Include
A repair proposal should name the existing membrane and the compatible materials being used. The method needs to follow that roof manufacturer’s current instructions for the condition found. An older open seam should not automatically be treated like a fresh installation seam that can simply be welded again.
Surface preparation matters just as much as the visible patch. GAF’s seam-cleaning bulletin distinguishes ordinary dirt from weathering and chemical contamination because those conditions need different treatment. Some contamination may prevent an adequate weld even after attempted cleaning. Before accepting a proposal to cover an old repair, ask whether the contractor has established that the surrounding membrane is suitable for the intended bond.
Depending on the defect and the applicable system instructions, the repair may involve a localized patch or a wider membrane overlay along the affected seam. Manufacturer guidance also calls for repaired heat-welded seams to be checked after cooling. Ask for the completed repair photos and confirmation that this check was performed; a neat appearance alone is not the same evidence.
When the Inspection Needs to Go Beyond One Seam
One confirmed defect does not establish that every seam has failed. Equally, a small visible gap does not establish that the work can stop at the surface. If there has been leakage, ask how the roofer will determine whether insulation or other materials beneath the membrane have become wet and whether additional investigation is needed.
Closing the entry point and addressing existing moisture are separate parts of the repair decision. GAF’s requirements for preparing an existing TPO roof for a liquid-applied system, for example, call for replacing wet insulation rather than covering it. The precise scope for your roof should follow the actual findings, including any affected underlying materials. Repeated defects in different areas warrant a broader assessment before a series of isolated patches is approved.
Ask for a Repair Scope You Can Check
Before authorizing TPO seam repair, ask the contractor to put the findings and proposed work in the same written scope. It should identify the affected locations and lengths, the preparation and repair materials, any work needed below the membrane, and how the finished seams will be checked. If the estimate says only “seal seams,” request enough detail to understand what that includes. Keep the report and completion photos with the building’s roof records so a later inspection has something useful to compare.
Get the Suspected Seam Assessed
If you are arranging commercial TPO roof repair in Spring, TX, Royal Crown Roofing can help you take the next step with its commercial roof repair services and experience with TPO roofing systems. Share the inspection photos, leak locations, and any earlier repair records when requesting an assessment. That gives the conversation a clear starting point: confirm the defect, establish its extent, and discuss the work the findings support.
by royalcrownroofing | Nov 2, 2026 | Roof Repair
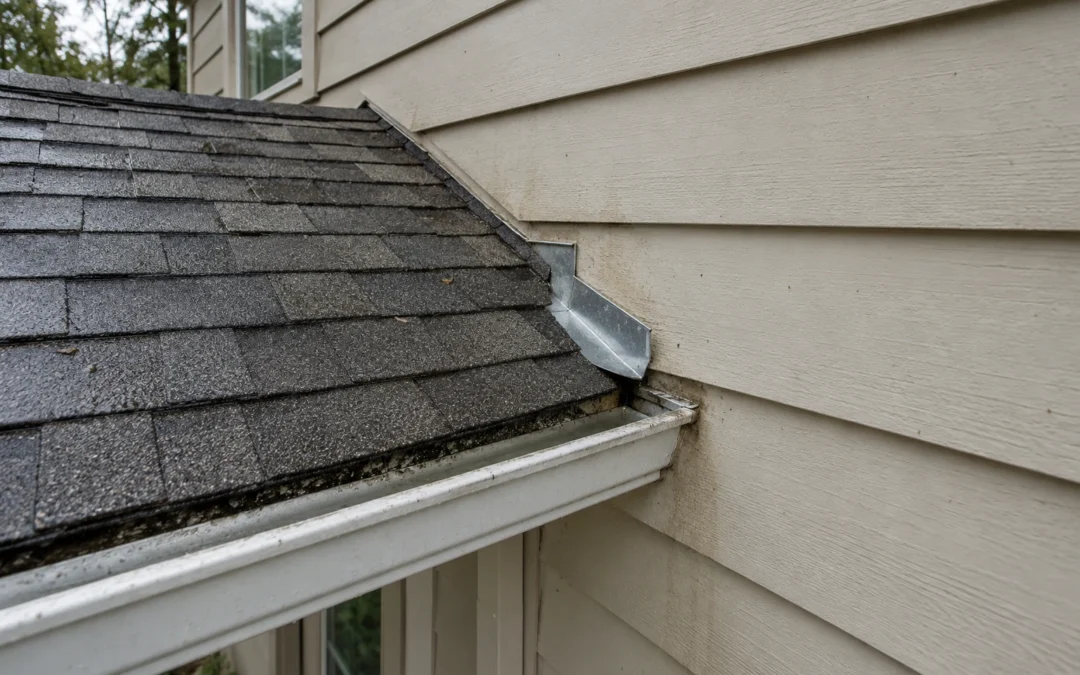
A stain keeps returning below the same roof corner. You clean the siding, check the gutter, and watch it reappear after another rain. The shingles above may look ordinary, which makes it hard to understand why this one patch of wall stays wet. If a lower roof ends against a taller wall, missing kickout flashing is one detail worth having checked.
This small diverter helps send concentrated roof runoff away from the wall and into the gutter. When it is absent or poorly connected, the repair question extends beyond the visible stain: where is the water going, and what has it reached behind the exterior finish?
Kickout Flashing Has a Different Job From Step Flashing
On an asphalt-shingle roof, step flashing consists of overlapping pieces woven into the shingles along an adjoining wall. Kickout flashing belongs at the bottom of that junction, where it turns the runoff outward before it can spill down the continuing wall. Drip edge, by comparison, runs along the roof perimeter and helps direct water away from the roof edge. These details work together, but one does not replace another. A gutter beside the wall still needs water to reach it through a properly detailed transition.
Why a Missing Diverter Can Wet More Than the Siding
Picture rain traveling down the narrow line where a sloped roof meets a wall. That junction collects runoff and delivers it to a small area at the bottom. Without a suitable kickout, the flow can wash the wall below instead of turning into the gutter.
Some water may remain on the exterior, leaving a visible trail. Water that gets behind the siding or other cladding must be managed by the wall’s concealed drainage layers and flashing. Repeated wetting at a poorly detailed junction can reach sheathing or framing, even when the outer surface looks reasonably intact. Building Science Corporation’s documented investigation of a roof-to-wall junction shows why the visible finish alone cannot establish the condition underneath.
Clues That Deserve a Closer Look
The location of a stain matters more than its color. A recurring streak directly below the end of a roof-to-wall junction is a useful clue, especially if you can see runoff taking that route during rain.
Peeling paint, swollen trim, or deterioration near a window below the junction can add to the concern. These observations do not prove that kickout flashing is missing, and similar symptoms can have other causes. The Building America Solution Center illustrates wall and window damage beneath roof corners lacking kickout flashing. Its examples help explain the pattern, rather than provide a diagnosis for every stained wall.
Take photos from the ground or another safe viewpoint, including the roof corner, gutter end, and wall below. Note whether the mark grows after rain and whether you have noticed moisture indoors in the same area. Avoid climbing onto the roof or pulling siding loose to investigate; concealed connections need a closer professional assessment.
Why More Caulk May Leave the Water Path Unchanged
A bead of sealant cannot provide the outward turn that missing kickout flashing was meant to create. Nor does attaching a small metal tab over the siding establish that water behind the cladding will drain safely. Sealants can have legitimate uses in a specified flashing detail, but the repair still needs compatible materials and correctly overlapped connections. Repainting the stain or adjusting a gutter without checking that junction may leave the original runoff path in place.
What a Useful Inspection Should Establish
Start by asking the roofer to show you where the roof-to-wall runoff leaves the junction. Is a kickout present, is it damaged, and does its shape actually direct water away from the wall? A visible piece of metal is only part of the answer.
The adjoining step flashing and wall drainage layer also need attention. Building America guidance emphasizes integrating flashing with both roof and wall layers so water drains down and outward instead of behind the assembly. Some of those connections may be concealed by siding, so a visual inspection has limits. Ask what can be confirmed without opening the area and what additional access would be needed to assess suspected damage.
The assessment should also consider nearby gutter connections, wall openings, and other plausible entry points. If moisture has already reached interior finishes, the explanation should connect that evidence with the suspected exterior water path before a repair scope is settled.
What a Lasting Kickout Flashing Repair May Involve
The size of the flashing piece does not tell you how much work the repair will require. In an existing home, access may involve lifting shingles and removing enough wall cladding to reach the concealed drainage layers. Damaged sheathing or other affected materials may need repair before the junction is closed. Building America’s guidance for existing homes describes flashing replacement as a possible stand-alone retrofit, so this defect does not by itself establish that a full roof replacement is necessary.
A useful proposal should explain both the flashing correction and any work needed to reach or restore the surrounding materials. If siding, stucco, or concealed wall damage is involved, ask who will handle that portion and how the roofing and wall work will be coordinated. The appropriate approach depends on the wall construction and the condition uncovered, rather than a standard promise that every missing diverter is a simple surface repair.
Have the Roof Corner Checked Before Covering the Stain
If you suspect missing kickout flashing at your Spring or North Houston home, Royal Crown Roofing can evaluate the roof-to-wall junction and discuss the roofing work it may need. Review the company’s roof repair services, then contact the team to arrange an inspection. Understanding where the water is going gives you a better basis for deciding what needs repair and whether another trade should be involved.
